| Contents |
| Home |
| Parallel Port |
| DLL Tutorial |
| Inpout32 |
| Download/Buy Activex Controls |
 |
|
Logix4u http://www.logix4u.net/ |
| Parallel port Interfacing Tutorial | ||||||||||||||||||||||||||||||||||||||||||||||||||||||||||||||||||||||||||||||||||||||||||||||||||||||||||||
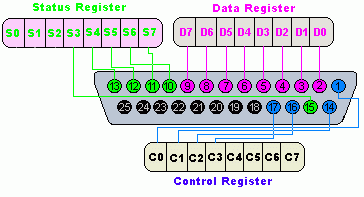
| Introduction Parallel port is a simple and inexpensive tool for building computer controlled devices and projects. The simplicity and ease of programming makes parallel port popular in electronics hobbyist world. The parallel port is often used in Computer controlled robots, Atmel/PIC programmers, home automation, ...etc... Here a simple tutorial on parallel port interfacing and programming with some examples. Everybody knows what is parallel port, where it can be found, and for what it is being used. the primary use of parallel port is to connect printers to computer and is specifically designed for this purpose. Thus it is often called as printer Port or Centronics port (this name came from a popular printer manufacturing company 'Centronics' who devised some standards for parallel port). You can see the parallel port connector in the rear panel of your PC. It is a 25 pin female (DB25) connector (to which printer is connected). On almost all the PCs only one parallel port is present, but you can add more by buying and inserting ISA/PCI parallel port cards. Parallel port modes The IEEE 1284 Standard which has been published in 1994 defines five modes of data transfer for parallel port. They are, 1) Compatibility Mode 2) Nibble Mode 3) Byte Mode 4) EPP 5) ECP The programs, circuits and other information found in this tutorial are compatible to almost all types of parallel ports and can be used without any problems (Not tested, just because of confidence ! ). More information on parallel port operating modes can be found here. Hardware The pin outs of DB25 connector is shown in the picture below 
The lines in DB25 connector are divided in to three groups, they are 1) Data lines (data bus) 2) Control lines 3) Status lines As the name refers , data is transferred over data lines , Control lines are used to control the peripheral and of course , the peripheral returns status signals back computer through Status lines. These lines are connected to Data, Control And Status registers internally . The details of parallel port signal lines are given below
Parallel port registers As you know, the Data, Control and status lines are connected to there corresponding registers inside the computer. So by manipulating these registers in program , one can easily read or write to parallel port with programming languages like 'C' and BASIC. The registers found in standard parallel port are , 1) data register 2) Status register 3) Control register As there names specifies, Data register is connected to Data lines, Control register is connected to controll lines and Status lregistyer is connected to Status lines. (Here the word connection does not mean that there is some physical connection between data/control/status lines. The registers are virtually connected to the corresponding lines.). So what ever you write to these registers , will appear in corresponding lines as voltages, Of course, you can measure it with a multimeter. And What ever you give to Parallel port as voltages can be read from these registers(with some restrictions). For example , if we write '1' to Data register , the line Data0 will be driven to +5v. Just like this ,we can programmatically turn on and off any of the data lines and Control lines. Where these registers are ? In an IBM PC, these registers are IO mapped and will have unique address. We have to find these addresses to to work with parallel port. For a typical PC , the base address of LPT1 is 0x378 and of LPT2 is 0x278. The data register resides at this base address , status register at baseaddress + 1 and the control register is at baseaddress + 2. So once we have the base address , we can calculate the address of each registers in this manner. The table below shows the register addresses of LPT1 and LPT2
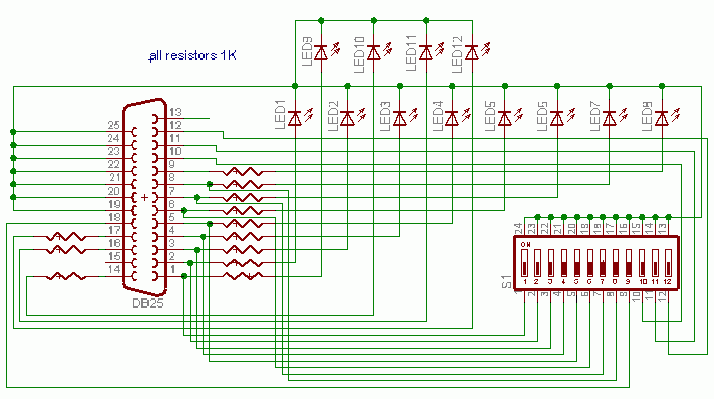
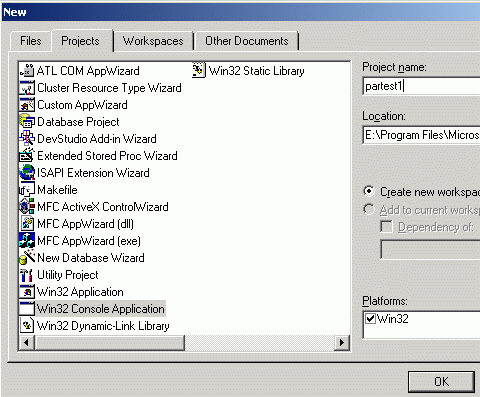
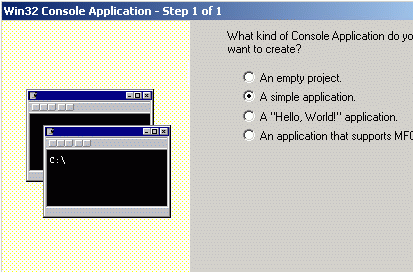
Programming Concepts Almost all programming languages allow programmers to access parallel port using some library functions. For example , Borland C is providing "Inportb" and "Outportb" functions to read or write IO mapped peripherals. But the examples provided here in this tutorial is written VC++ and can be easily ported to other compilers like Borland C and Turbo C. Visual Basic does not have any functions or support to access parallel port directly, but it is possible to add such capabilities to your VB application by writing a dll in VC++ and calling its exported functions from VB. VC++ provides two functions to access IO mapped peripherals, '_inp' for reading and '_outp' for writing. These functions are declared in "conio.h". Hardware for testing sample programs The schematic diagram of the test circuit is shown below. It is recommended to build this circuit before testing the sample programs  Sample program in VC++ Writing a parallel port interfacing program in VC++ is very easy. Here is the steps to write your first parallel port interfacing application in VC++. Start VC++ IDE , Select 'New' from File menu.Then select “Win32 Console Application” from “Projects” tab(picture-3). enter project name as “partest1” , then click OK button.  Picture-3 Now you can see a dialog box with caption “Win32 Console Application - step 1 of 1” (picture-4).  Picture-4 Select “a simple Application” and click Finish. Now open exaple1.cpp from “fileview” and replace the existing code with the code given below.
Build the project and copy partest1.exe to "c:\". How to Test The Program ? Connect The assembled hardware shown above to your PC's parallel port. Open DOS command window Move to "C:\" and type "partest1 write 888 255" and press enter. If everything is correct , LED1 to LED8 in the hardware will glow. You may be doubtful about the command line parameters passed to the program. Here 888(0x378) is the address of the parallel port data register and 255 is the data to be written to parallel port data register. if you enter "partest1 read 888" to command line , the program will read parallel port data register and display it. This will blindly read the contents of parallel port data register , but not the data present on data lines. To read the data from the data lines , we will have to enable the bidirectional data transfer first. To enable Biirectional data transfer just set the "Bidirectional" bit (bit 5) in control register. This is done by writing 32 to control register. The command "partest1 write 890 32" will do this. After entering this command you can read the status of switches in the hardware using the command "partest1 read 888" NOTE: This sample program will not work on Windows NT/2000 or XP if you run the program on these machines , it will show an error. use new Inpout32.dll on NT/2000/XP machines | ||||||||||||||||||||||||||||||||||||||||||||||||||||||||||||||||||||||||||||||||||||||||||||||||||||||||||||
 |